Windows versions as far back as Vista are fully supported when using the Ember CLI.
To get started ensure the following dependencies are installed:
- Node.js - https://nodejs.org/en/
- Git - https://git-scm.com/
- Chrome - https://www.google.com/chrome/
WSL 2
For the best experience developing Ember apps in Windows, we recommend using WSL 2.
Since build 20262 of Windows 10 Windows Subsystem for Linux (WSL) 2 is available. WSL allows you to run a Linux system on your Windows computer that allows you to use some Linux tools and gives much better performance and file path resolution for developing Ember on Windows.
Once you have followed the guide to install WSL 2 you can then install the latest Ubuntu from the Microsoft store (instructions are also included in the guide).

You will need to make sure that you have Node.js installed in your WSL environment, if you haven't already done so you can follow this guide.
Open your terminal on your WSL environment (for more information you might want to follow this guide) and then clone your Ember app repository.
cd ~
git clone your-repo
you can now install your dependencies and start the Ember app:
cd ~/your-repo
npm i
npm start
IF you use VSCode, there is a useful plugin to make sure that it uses your WSL environment called "Remote - WSL". For more information you can follow this tutorial.
Performance
Although supported, Windows performance, at least by default, isn't as good as on Linux or MacOS. On a positive note, this story continues to improve. Both Microsoft, and the Ember CLI team continue to work on improving these developer ergonomics.
What causes the build slowdown?
The two primary reasons are:
- Lack of enabled-by-default symlinks
- Generally slower filesystem operations on NTFS
Improving your Windows experience
Ensure Search and Defender ignore your project's tmp directory:
npm install -g ember-cli-windowsThen, to start the automatic configuration, run:
ember-cli-windowsMake sure you use an elevated PowerShell. If there was an error, try executing Set-ExecutionPolicy Unrestricted -scope Process first.
Enabling symlinks
To create symlinks the account running Ember CLI must have the
SeCreateSymbolicLinkPrivilege. Users in the Administrators group have this
permission already. However, if UAC (User Access Control) is enabled, users in
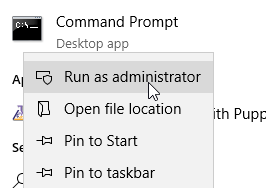
the Administrators group must run their shell using Run As Administrator
because UAC strips away certain permissions from the Administrators +group,
including SeCreateSymbolicLinkPrivilege.

If the user account is not part of the Administrators group you will need to
add the SeCreateSymbolicLinkPrivilege to allow the creation of symlinks. To
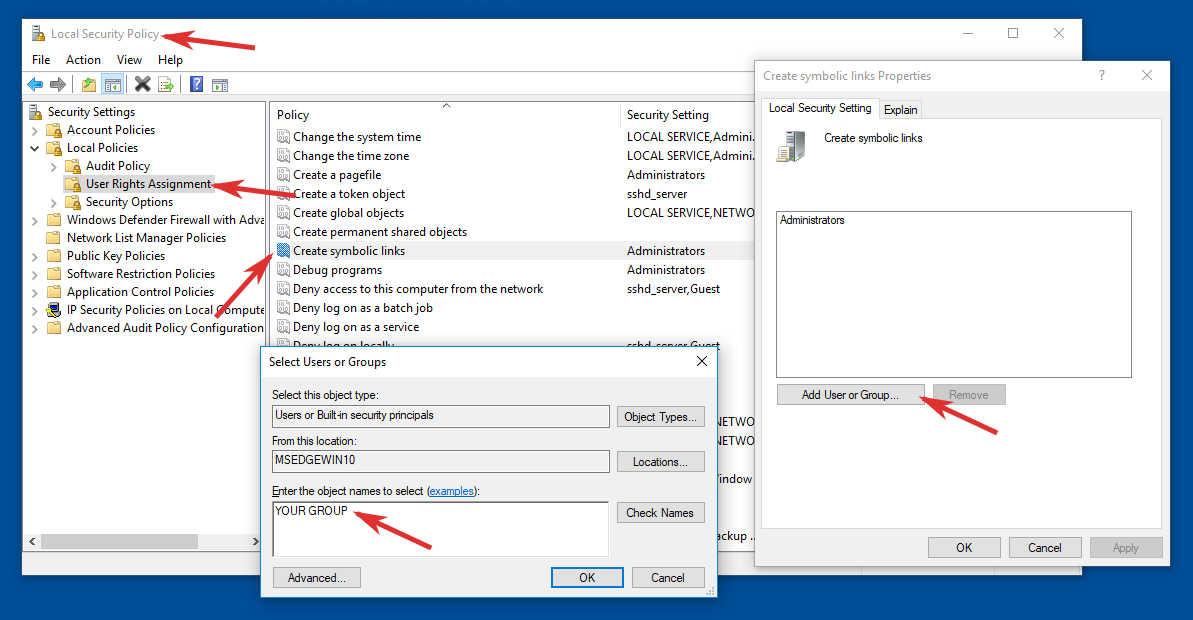
do this open the Local Security Policy by typing secpol.msc in the
Windows Run Box (WIN+R).
Under Local Policies -> User Rights Assignment find the Create symbolic
links policy and double-click it to add a new user or group. Once your user or
group has been added, your user should be able to create symlinks. Keep in mind
if your user is part of the Administrators group and UAC is enabled you will
still need to start your shell using Run as Administrator.

Issues With npm: EEXISTS, Path too Long, etc
There were always two major issues with running Node.js on Windows: first and
foremost, the operating system maintains a maximum length for path names, which
clashes with Node's traditional way of nesting modules in node_modules. The
second issue was a bit more subtle: The npm installer had a set of steps it
executed for each package and it would immediately start executing them as soon
as it decided to act on a package resulting in hard-to-debug race conditions.
npm 3 is a nearly complete rewrite of npm, fixing both issues. Windows users of
Ember CLI might want to make the switch to npm 3 to benefit from its
flat module installation (solving most issues involving long path names) as well
as its multi-stage installer.